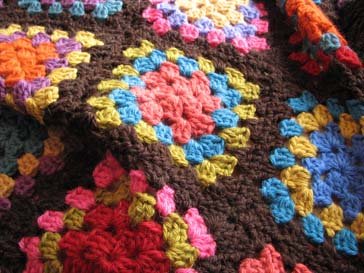
 Granny squares are one of the most common forms of crochet around. Everywhere you look, you’ll find hints of them in crochet. These aren’t your Granny’s squares, though. Today, you can find them in bright color combinations and used in ways that are innovative and unique. If you don’t know how to crochet granny squares, you’re missing out. Not only are these a fun project to make, but they are also very easy once you see a pattern. Read on and then try them out yourself. You’ll probably find yourself hooked!
Granny Square Tutorial
While there are many different kinds of granny squares you can try, there is one that is the most basic form. This square is so basic that you could even make this as one of your first projects and it would still come out looking good.
This cluster stitch granny square is worked in the round, and has a lot of versatility. You can create it using one color or multiple colors, and you can make it as big or as small as you’d like. This square looks just as good with 3 rounds as it does with 30 rounds, so take this basic tutorial on how to crochet granny squares and just run with it!
Chain 4 and join into a circle with a slip-stitch.
Round 1: Chain 3, then work 2 double crochet into your chain-4 circle. Chain 2 then work 3 double crochet into your chain-4 circle. Repeat this step 2 more times so that you have a series of 4 cluster stitches in a circle. Join with a slip stitch.
Round 2: Chain 3, then work 2 double crochet into the chain 2 space. Chain 2 then work 3 double crochet into the chain 2 space. Continue working 2 cluster stitches into each chain 2 space for this round. Join with a slip stitch and tie off.
From here, you’ll work 2 cluster stitches into the corner, and one cluster stitch into every other chain 2 space in your square. You can continue in this pattern for as many rows as you like. If you want a standard sized granny square, you’ll probably want to limit it to between three and five rounds, but many crocheters love working in this same pattern until they’ve created an entire blanket out of one granny square.
Personally, I like to change colors either every row or every two rows for small squares. If I go any longer than that using the same color it starts to look sort of boring and plain. However, the beauty of granny squares is that you can make them however you like! If you like your granny squares to be all one color, then make them all one color! So, now that you’ve made your granny squares, how do you put them together?
How to Join Granny Squares
Granny squares are a lot of fun to make, but they aren’t really very useful if you don’t know how to put them together properly. Luckily, there are quite a few techniques you can use to put your granny squares together so you can find the one you like best.
The simplest method for joining granny squares is to use a whip-stitch. This is where you take a darning needle and yarn, and simply sew the two squares together. This technique works well if you don’t mind having your seam show on your work. However, since it’s a very visible join, it’s not always the most popular method to use.
Another popular method is to use a slip-stitch to join your squares. To use this method you would just use the same sized crochet hook that you used to create your squares and a matching yarn and slip stitch the squares together along the edge. This is another good technique, but it will not lay flat, so be aware of that before you choose it.
A very popular join among crocheters that make a lot of blankets is the join-as-you-go method of joining squares. This method basically consists of crocheting two incomplete squares together as you crochet the last row. It is seamless and allows you to put your project together as you work on squares, so many crocheters consider it a win-win method.
My personal favorite is the invisible join. I prefer this join because I really love to make blankets with multiple colors and patterns in them, rather than having the last row the same color on every square. By using this joining method, I can use any color yarn, and it nearly vanishes completely within the square, so I consider that a bonus. Once you’ve stitched up the two squares using the mattress stitch, you simply pull the end of the yarn and the stitch completely disappears, leaving behind two squares that look like they were just fused together.
So, now you not only know how to crochet granny squares, but you also know how to join them once you’re done! With the knowledge of these two skills, you can make many different projects, with the most popular being a blanket. So, go choose your favorite colors and start practicing your new skill!


